Location
Long Island, NY
Rating - 100%
11   0   0
Hello all,

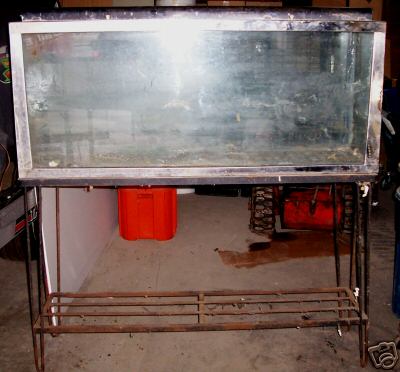
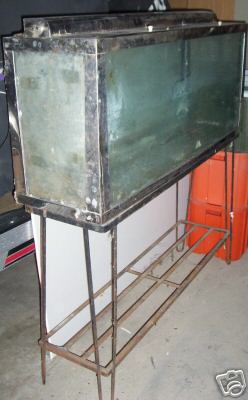
I just picked up a "vintage" (old) 55g tnak with a slate bottom and chrome trim. It's a pretty cool tank actually that I planned to clean up and reseal for use. the trim is about 1 inch wide on the top and bottom, and tapered from about 1 in. to 2 inches wide on the sides. The problem is, the chrome (or stainless--we'll see when it's clean) is held on by a thick (1/4 inch) layer of black caulk-like substance. My original plan was to totally dismantle the thing, clean it, and reassemble with black silicone. If I use a typical thin layer of silicone under the trim, though, the trim won't fit anymore (remember, I'm dealing with the size of the glass plus 1/4" of caulk--so I'll be 1/2 in. short each side).

Any ideas? should I

A. Leave the tank together with the black caulking and seal over it
B. Take it apart , reseal the glass and put the trim on after by filling the gap with silicone or caulking?

Then I'll have to send out a new MH fixture to get chromed too...hmmm
:scratch:
...and then neon...

give the fish rollerskates...

Christine :)
 

scarf_ace1981

Advanced Reefer
Location
San Juan, PR
Rating - 100%
103   0   0
i haven't seen one of those tanks since i worked @ an LFS many years ago. i really like them because they are so different from the tanks we see today. i would definately use it for freshwater but not so sure about saltwater. maybe some of the more experienced members on here can chime in. if they don't see a problem w/ using this tank i would then take it apart and reseal it. these tanks are so old you don't want to risk anything. best of luck

jon-
 

jhale

ReefsMagazine!
Location
G.V NYC
Rating - 100%
52   0   0
Christine, that sounds like a fun project.

If you replaced all the silicone then using the tank for saltwater
would be okay. otherwise I would be afraid of any meds that could have
been absorbed by the sealant like copper.

edit: I forgot about the slate bottom, will copper stick to the slate?

that might be the tougher thing to worry about.
 
Last edited:

jhale

ReefsMagazine!
Location
G.V NYC
Rating - 100%
52   0   0
I guess you could pour the two part epoxy over it. that might seal it, but then you would have a shiny slate bottom.

If there's no copper to worry about that would make for a neat bare bottom sps tank :)
 

Psycho graphic

Trouble Maker!
Rating - 100%
9   0   0
I do custom painting for a living, I'm not an expert on painting unusual substrates, but I can tell you getting anything other than clear powdercoat to stick to the chrome will be very hard. Chrome is extremely hard and smooth, there isn't anything for the laquer to bite into, therefore it will chip extemely easy.
 

jhale

ReefsMagazine!
Location
G.V NYC
Rating - 100%
52   0   0
I do custom painting for a living, I'm not an expert on painting unusual substrates, but I can tell you getting anything other than clear powdercoat to stick to the chrome will be very hard. Chrome is extremely hard and smooth, there isn't anything for the laquer to bite into, therefore it will chip extemely easy.

yeah I can see it flaking off after you described the chrome.

well what if you oiled the chrome everyday :)

I have a chrome cart from the 70's that's got some rust on it from just sitting in my apt. I could imagine that exposed to salt water chrome could get trashed pretty quick.
 

Sean

Advanced Reefer
Location
Brooklyn
Rating - 100%
14   0   0
can we get a pic of the tank? I dont think i've ever seen one of these, must be before my time :lol2:

If you want to see one I have a small one at my shop I could show you.


Personally I've only used these tanks for freshwater aquarium wouldn't trust them in a marine environment. The calk like sealant they used back then doesn't realy last so long, so I'd suggest resealing it with silicone and set up a kick ass planted FW aquarium.
 

masterswimmer

Old School Reefer
Vendor
Location
NY
Rating - 99.6%
448   2   0
Wow, I haven't seen one of these chrome/slate bottoms in years.......until just this past Saturday. I was in a LFS down near Philly, they had at least a dozen of them on display in various sizes. Brought back some memories.

I would also avoid the SW in this application. Not because of the copper, but because of the rusting and pitting of the chrome/SS.
 

Attachments

  • chrome aquarium.jpg
    chrome aquarium.jpg
    25.9 KB · Views: 115
  • chrome aquarium 2.jpg
    chrome aquarium 2.jpg
    18.1 KB · Views: 113

FRY

Senior Member
Rating - 100%
26   0   0
believe that there is a video where Rosario LeCorte demonstrates the
process. He claims that it takes about 10 minutes to flow seal almost any
tank, given a little practice. I tried it some twenty or so years ago, it
was a real mess. So I never actually got a little practice. Apparently the
secret is getting the stuff hot enough that it flows into the seems.

I usually rebuild my stainless tanks as follows:

1 cut out any tar that is still inside the tank
2 clean the tank until it is spotless. ALL OR JUST ABOUT ALL OF THE WHITE
DEPOSITS ON THE GLASS NEAR THE SEAMS MUST BE DISSOLVED OR SCRAPED OFF BEFORE
SEALING.
3 have a piece of glass cut that will fit into the bottom of the tank
covering the slate. SILICONE WILL NOT STICK TO SLATE FOR VERY LONG. -ABOUT 2
YEARS MAX- The slate is porous and the water will eventually work its way
under the silicone. The bottom of the tank must be lined.
4 put dabs of silicone on the slate about every 2 to 3 inches apart this
will support the glass liner.
5 seal the edges of the bottom leaving a little space for air to get out and
float in the new liner.
5 seal all of the seams glass to glass.
6 seal under the top rim of the tank to prevent siphoning under the top of
the frame.
7 from the outside fill any gaps in the tar with silicone to support the
panes.
8 let dry for at least 2 days.

Broken glass can be replaced and floated in with silicone. But it takes a
lot of silicone and a lot of time and effort. Most smaller tanks with broken
glass are just not worth the effort.

About 20 years ago I found a 5 gal tank in my fathers basement. It was broken
by a large bullfrog in the late 1960's and as it had been on my project list
for over 3 decades. I finally rebuilt it. The frame had been crushed as
something had fallen on it. I straightened the frame and had new glass cut,
removed all of the loose tar and replaced it with silicone. Cost about $4.00
for glass. $2.50 for silicone. About 5 hours for cleaning, strip down, loose
tar removal, broken glass removal, frame straightening and sealing. The tank
is has held water for at least 2 years. I designed a
custom drop in 1/4 inch Plexiglas hood for it at a cost of another 3 dollars
and about 2 hours of work. It is 2 inches shorter than a 5.5 gal tank and
fits where a 5.5 gal tank would not, so it is perfect for the application it
is now being used for. But I would not recommend this kind of heroic effort.
If you have space for a standard size tank a 5.5 gal all glass tank only
costs about $10.00 and canopies are readily available for about another
$7.00 pre-made.

I might add that the silicone does not stick very well to the metal frame
around the top of the tank. So handle it with care to prevent peeling it
off.

A metal frame tank, properly sealed with silicone, should last just as long
as an all glass tank. it will be more durable as the frame will support or
protect it.
 
Last edited:
Location
Long Island, NY
Rating - 100%
11   0   0
Wow, guys, thanks for all the input. Yep, my dad's advice was to do a clear powdercoat on it, but since it has to be cured in an oven, and I don't have access to a 55g size oven, that isn't a possibility. And yes, it is exactly the tank in those photos--thanks for putting that up there (being the Luddite I don't have a digital camera).

I do have a FW planted tank that could be upgraded to the 55, but geez a reef would have been sweet! Well, I guess I'll just have to look for another tank for my 2nd reef...and then another apartment to fit them all...

:)
 

Sponsor Reefs

We're a FREE website, and we exist because of hobbyists like YOU who help us run this community.

Click here to sponsor $10:


Top